(Source Code) Glassmorphism Login Page With HTML & CSS

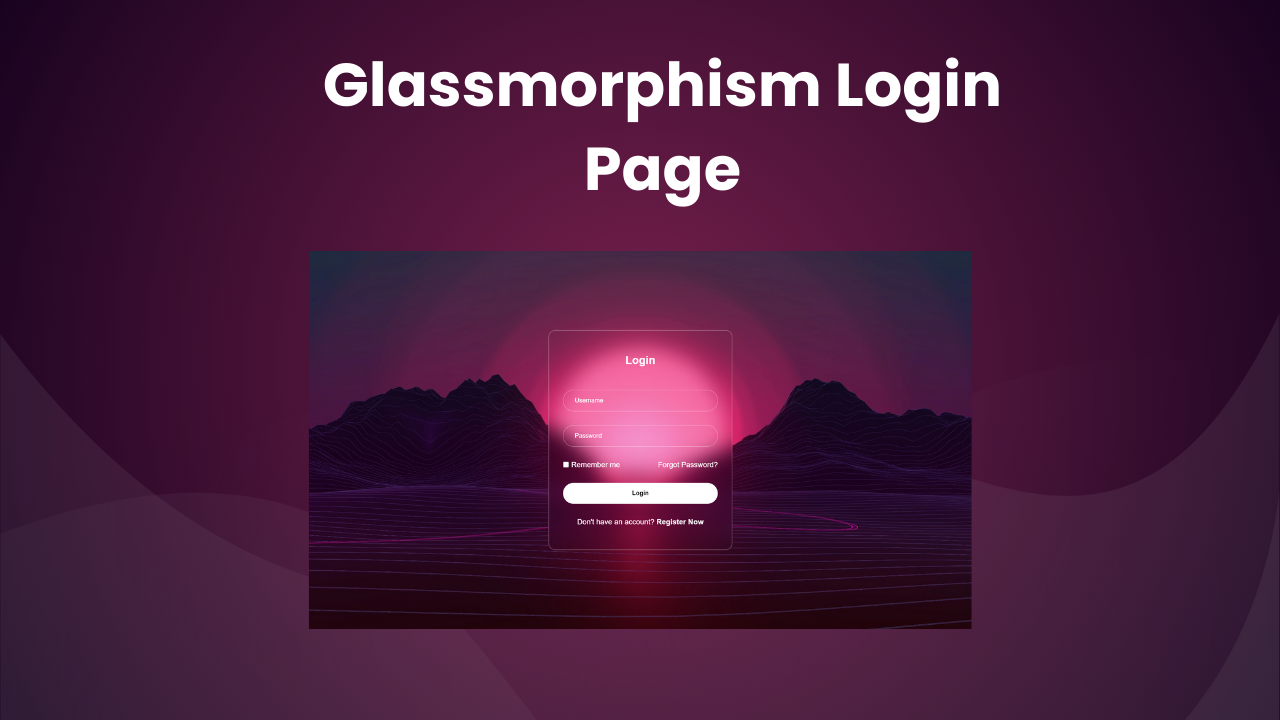
Hey! Frontend Web Developers In this post we will make a Glassmorphism Login Page With Pure HTML & CSS. We will also see the key concepts that are used to make this project like the glassmorphism effect, border radius, etc. That will help you to make such cool projects.
Also Read: Sliding Login & Sign Up Form
These key concepts will help you to make more cool projects & level up your frontend developer skills. At the end post, I will provide the entire HTML & CSS code so that you can run this on your local machine.
Key Concepts:
- CSS Universal Selector & Box Sizing
- CSS Flexbox & Media Queries
- Box Shadow & Border Radius
- CSS Button & Hover Effect
- CSS Responsive Font Sizing
Understanding HTML To Make Glassmorphism Login Page
- Form Start
- We begin with a form element, where users can input their login details.
<form action="">- Login Heading
- Inside the form, there’s a heading “Login” to indicate the purpose of the form.
<h2>Login</h2>- Username and Password Inputs
- Two input fields are provided for username and password, with placeholders to guide users.
   <input type="text" placeholder="Username" />
<input type="password" placeholder="Password" />- Remember Me Checkbox and Forgot Password Link
- Users can choose to remember their login details with a checkbox.
- A link is provided for users who forgot their password.
   <div class="rememberBox">
     <input type="checkbox" id="check" />
     <label for="check">Remember me</label>
     <a href="#">Forgot Password?</a>
</div>- Login Button
- A button is included for users to submit their login information.
<button class="submitBtn">Login</button>- Registration Link
- Lastly, a link is provided for users who don’t have an account yet.
<p>Don't have an account? <a href="#">Register Now</a></p>Understanding CSS To Make Glassmorphism Login Page
- Global Styles: Common styles like font, background, and layout are set for the entire HTML document with the help of the CSS global selector “*”.
- Body Styles: The body is centered vertically and horizontally to put the login page exactly at the center of the page with a background image covering the entire viewport.
- Form Styles: The form is styled with a border, padding, and a blurred background effect & Inputs have white borders and padding for user input.
- Remember Box Styles: The remember box, containing the remember me checkbox and forgot password link, is styled to be horizontally spaced.
- Submit Button Styles: The login button is styled with a solid background color, contrasting with the text for better visibility.
- Link Styles: Links are styled to remove the default underline with the help of the “text-decoration: none” property.
Source Code Of Glassmorphism Login Page ( HTML & CSS )
HTML:
 <form action="">
      <h2>Login</h2>
      <input type="text" name="" id="" placeholder="Username" />
      <input type="password" name="" id="" placeholder="Password" />
      <div class="rememberBox">
        <div>
          <input type="checkbox" name="" id="check" />
          <label for="check">Remember me</label>
        </div>
        <a href="#">Forgot Password?</a>
      </div>
      <button class="submitBtn">Login</button>
      <p>Don't have an account? <a href="#">Register Now</a></p>
    </form>
CSS:
 <style>
        * {
  padding: 0;
  margin: 0;
  box-sizing: border-box;
  font-family: Arial, Helvetica, sans-serif;
  color: #fff;
}
body {
  display: flex;
  justify-content: center;
  align-items: center;
  height: 100vh;
  background-image: url(https://wallpapercave.com/wp/wp8828769.jpg);
  background-position: center;
  background-size: cover;
  background-repeat: no-repeat;
}
form {
  display: flex;
  flex-direction: column;
  align-items: center;
  gap: 30px;
  width: 400px;
  height: fit-content;
  padding: 50px 30px;
  background: transparent;
  border: rgba(255, 255, 255, 0.2) 2px solid;
  box-shadow: rgba(0, 0, 0, 0.2);
  border-radius: 15px;
  backdrop-filter: blur(20px);
}
form h2 {
  margin-bottom: 20px;
}
form > input {
  width: 100%;
  border: #ffffff84 1px solid;
  background: none;
  padding: 15px 25px;
  outline: none;
  border-radius: 25px;
}
form > input::placeholder {
  color: #fff;
}

.rememberBox {
  display: flex;
  justify-content: space-between;
  width: 100%;
}
.rememberBox > div {
  display: flex;
  gap: 5px;
}
.rememberBox > div input {
  accent-color: #fff;
}
.submitBtn {
  width: 100%;
  padding: 15px 25px;
  border: none;
  background: #fff;
  color: #000;
  border-radius: 25px;
  font-weight: bold;
  cursor: pointer;
}
a {
  text-decoration: none;
}
p a {
  font-weight: 600;
}

    </style>
Last Updated: June 18, 2024


