Simple Minimal Toggle Switch With Pure CSS

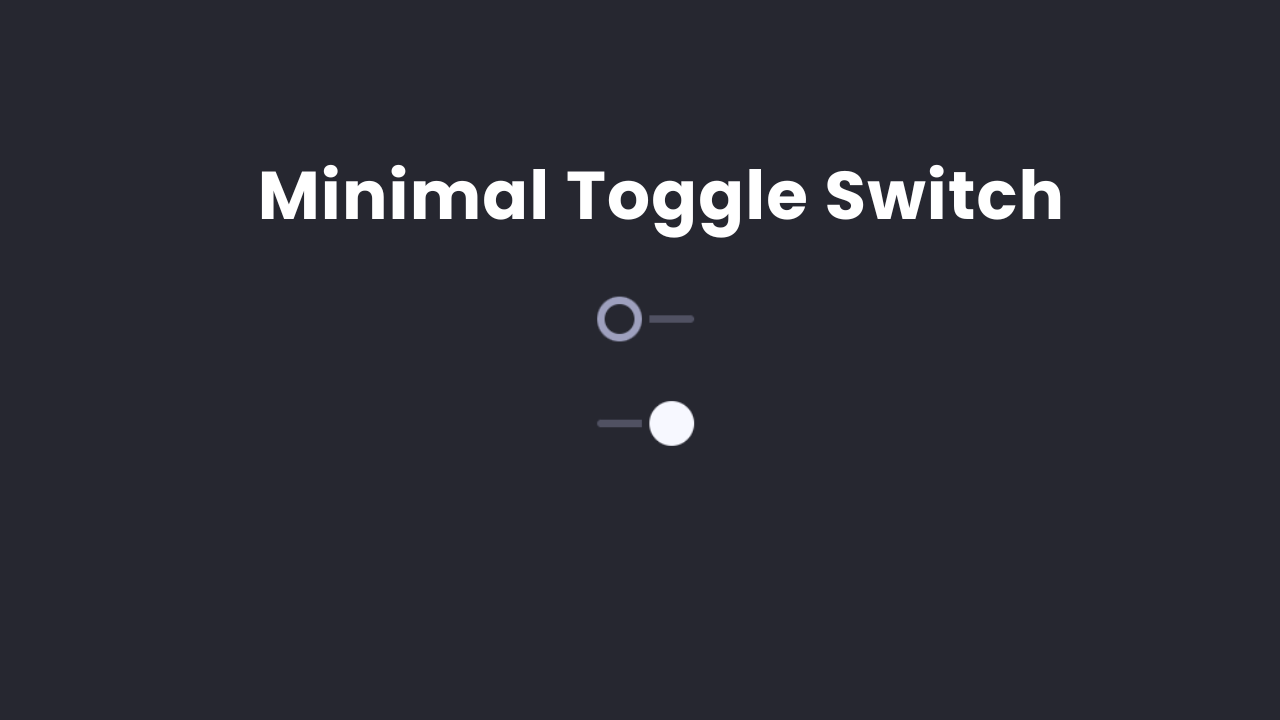
Hey! Frontend Web Developers, In this post we will make a simple yet multipurpose minimal Toggle Switch with Pure CSS & HTML. We will use basic HTML concepts like the Input checkbox & use before, After, and Not Pseudo classes to make it look minimal & advanced.
Also Read: Night & Day Mode Toggle Switch With HTML, CSS & Js
This post displays the power of CSS & how we can make dynamic elements without using JavaScript. We will understand CSS code step by step so that you can make such projects on your own. At the end, I will provide the entire code to run this project on your local device.
Concepts Used To Make Minimal Toggle Switch
- CSS Before & After
- CSS (: Not) & (: empty) Pseudo Classes.
- HTML Checkbox & use of the checked attribute.
Understanding HTML To Make Minimal Toggle Switch
The HTML code uses label elements with a class switch to create the toggle switch. Inside each label, there’s an input of type checkbox, a div, and a span. The input is the actual checkbox, while the div and span are used for styling the switch.
<label class="switch">
    <input type="checkbox">
    <div>
        <span></span>
    </div>
</label>

<label class="switch">
    <input type="checkbox" checked>
    <div>
        <span></span>
    </div>
</label>
<label class="switch">: Acts as a container for each switch, making the whole component clickable.<input type="checkbox">: The actual checkbox, which will be hidden and styled as a switch.<div>: A container for the visual elements of the switch.<span></span>: Used for additional styling and animation.
Understanding CSS To Make Minimal Toggle Switch
The CSS styles the switches with variables and animations. Let’s break it down step-by-step.
Setting Up Variables
The --line, --dot, --circle, --duration, and --text are CSS custom properties (variables) that define colors and animation duration for the switch.
.switch {
    --line: #505162;
    --dot: #f7f8ff;
    --circle: #9ea0be;
    --duration: 0.3s;
    --text: #9ea0be;
    cursor: pointer;
}--line: Color of the line in the switch.--dot: Color of the dot (toggle button) when checked.--circle: Initial color of the dot.--duration: Duration for transitions.--text: Color of any text inside the switch.
Hiding the Checkbox
The input is hidden using display: none, allowing custom styles to show in its place.
.switch input {
    display: none;
}
Positioning the Container
The div the element inside the switch is positioned relatively. This sets up a context for absolutely positioning the pseudo-elements.
.switch input + div {
    position: relative;
}
Creating the Switch Background
Pseudo-elements :before and :after on div are used to create the switch background lines. The lines’ transformations are controlled by the --s variable, which scales them.
.switch input + div:before, .switch input + div:after {
    --s: 1;
    content: '';
    position: absolute;
    height: 4px;
    top: 10px;
    width: 24px;
    background: var(--line);
    transform: scaleX(var(--s));
    transition: transform var(--duration) ease;
}:before: Creates the left part of the line.:after: Creates the right part of the line.
.switch input + div:before {
    --s: 0;
    left: 0;
    transform-origin: 0 50%;
    border-radius: 2px 0 0 2px;
}:beforeis initially hidden by setting--s: 0, and it scales from the left edge.
.switch input + div:after {
    left: 28px;
    transform-origin: 100% 50%;
    border-radius: 0 2px 2px 0;
}:afterstarts visible and scales from the right edge.
Positioning the Text Span
The span element is used for displaying optional text, which is styled to have a padding and line height.
.switch input + div span {
    padding-left: 56px;
    line-height: 24px;
    color: var(--text);
}
Creating the Toggle Button
The :before pseudo-element on the span acts as the toggle button. It’s styled to look like a circle and placed at the left initially. It also uses the --x, --b, and --s variables for position, border size, and color.
.switch input + div span:before {
    --x: 0;
    --b: var(--circle);
    --s: 4px;
    content: '';
    position: absolute;
    left: 0;
    top: 0;
    width: 24px;
    height: 24px;
    border-radius: 50%;
    box-shadow: inset 0 0 0 var(--s) var(--b);
    transform: translateX(var(--x));
    transition: box-shadow var(--duration) ease, transform var(--duration) ease;
}:beforeis a circle with a shadow that gives the appearance of a button.--xcontrols its horizontal position.--band--scontrol the border color and size.
Handling Empty Spans
The :not(:empty) selector ensures that when the span is not empty (contains text), the padding is adjusted.
.switch input + div span:not(:empty) {
    padding-left: 64px;
}
Styling the Checked State
When the checkbox is checked, the :checked pseudo-class applies styles to the switch. The background lines and the toggle button are animated to show the “on” state.
.switch input:checked + div:before {
    --s: 1;
}
.switch input:checked + div:after {
    --s: 0;
}
.switch input:checked + div span:before {
    --x: 28px;
    --s: 12px;
    --b: var(--dot);
}
:checked + div:before: Scales the left part of the line to full width.:checked + div:after: Hides the right part of the line.:checked + div span:before: Moves the toggle button to the right and changes its appearance.
Global Styles
Some global styles set up box-sizing, font smoothing, and body styling. The body is centered with a dark background, and label elements are given vertical spacing.
html {
    box-sizing: border-box;
    -webkit-font-smoothing: antialiased;
}
*, *:before, *:after {
    box-sizing: inherit;
}
body {
    min-height: 100vh;
    display: flex;
    justify-content: center;
    align-items: center;
    flex-direction: column;
    position: relative;
    background: #262730;
}
body .switch + .switch {
    margin-top: 32px;
}Thehtml,,:before, and:after` rules ensure consistent box-sizing.Thebody` is styled to center its content and has a dark background.
Source Code Of Minimal Toggle Switch
HTML:
<label class="switch">
    <input type="checkbox">
    <div>
        <span></span>
    </div>
</label>

<label class="switch">
    <input type="checkbox" checked>
    <div>
        <span></span>
    </div>
</label>
Also Read: Light Bulb Switch with pure CSS & HTML
CSS:
<style>
    .switch {
	 --line: #505162;
	 --dot: #f7f8ff;
	 --circle: #9ea0be;
	 --duration: 0.3s;
	 --text: #9ea0be;
	 cursor: pointer;
}
 .switch input {
	 display: none;
}
 .switch input + div {
	 position: relative;
}
 .switch input + div:before, .switch input + div:after {
	 --s: 1;
	 content: '';
	 position: absolute;
	 height: 4px;
	 top: 10px;
	 width: 24px;
	 background: var(--line);
	 transform: scaleX(var(--s));
	 transition: transform var(--duration) ease;
}
 .switch input + div:before {
	 --s: 0;
	 left: 0;
	 transform-origin: 0 50%;
	 border-radius: 2px 0 0 2px;
}
 .switch input + div:after {
	 left: 28px;
	 transform-origin: 100% 50%;
	 border-radius: 0 2px 2px 0;
}
 .switch input + div span {
	 padding-left: 56px;
	 line-height: 24px;
	 color: var(--text);
}
 .switch input + div span:before {
	 --x: 0;
	 --b: var(--circle);
	 --s: 4px;
	 content: '';
	 position: absolute;
	 left: 0;
	 top: 0;
	 width: 24px;
	 height: 24px;
	 border-radius: 50%;
	 box-shadow: inset 0 0 0 var(--s) var(--b);
	 transform: translateX(var(--x));
	 transition: box-shadow var(--duration) ease, transform var(--duration) ease;
}
 .switch input + div span:not(:empty) {
	 padding-left: 64px;
}
 .switch input:checked + div:before {
	 --s: 1;
}
 .switch input:checked + div:after {
	 --s: 0;
}
 .switch input:checked + div span:before {
	 --x: 28px;
	 --s: 12px;
	 --b: var(--dot);
}
 html {
	 box-sizing: border-box;
	 -webkit-font-smoothing: antialiased;
}
 * {
	 box-sizing: inherit;
}
 *:before, *:after {
	 box-sizing: inherit;
}
 body {
	 min-height: 100vh;
	 display: flex;
	 justify-content: center;
	 align-items: center;
	 flex-direction: column;
	 position: relative;
	 background: #262730;
}
 body .switch + .switch {
	 margin-top: 32px;
}
 body .dribbble {
	 position: fixed;
	 display: block;
	 right: 20px;
	 bottom: 20px;
}
 body .dribbble img {
	 display: block;
	 height: 28px;
}

</style>
Last Updated: June 18, 2024


