Animated Ribbon Login Page With HTML & CSS 3

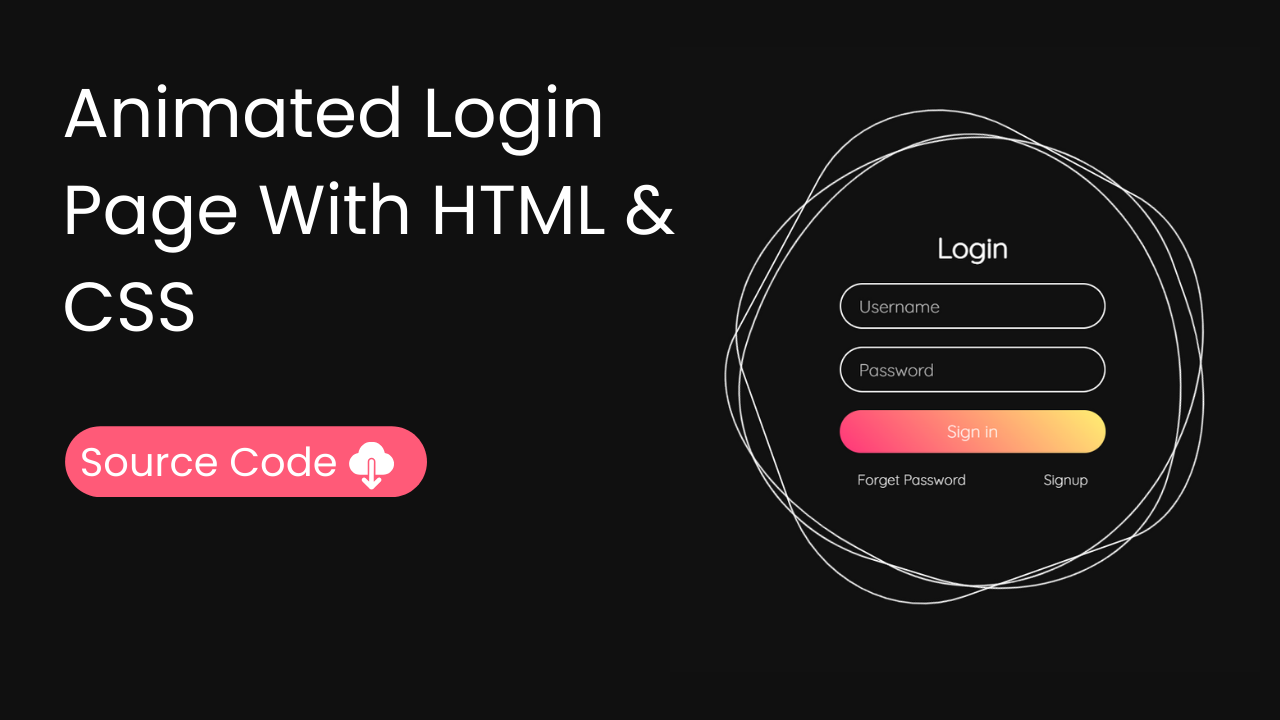
Hello, frontend developers. In this blog post, we will make an animated Ribbon Login Page With HTML And CSS & understand all the key concepts that will help you to make projects like this on your own.
At the end of this page, I will provide the entire HTML & CSS of this project that you can copy to run this awesome project on your local device.
Also Read: Glassmorphism Login Page With HTML & CSS
Key Takeaways:
- Understanding Border Radius
- Understanding glow effect
- Understanding keyframes
- CSS Rotate Property
- Using CSS Variables Inside HTML For Dynamic Effect
Understanding HTML For Creating Animated Ribbon Login Page
- Container Div
We start with a div element that has a class of ring. This div serves as a container for our entire login page.
<div class="ring">- Decorative Elements (i tags)
Inside this div, we add three i tags. These tags are used for decorative purposes, and each has a different color specified using CSS variables (--clr). These colors will be used later in the CSS to create a rotating ring effect.
   <i style="--clr: #00ff0a"></i>
   <i style="--clr: #ff0057"></i>
<i style="--clr: #fffd44"></i>- Login Form Container
We then create another div inside the ring container with a class of login. This div contains all the elements of our login form.
<div class="login">- Login Heading
Inside the login div, we have an h2 element for the login heading.
<h2>Login</h2>- Username Input Field
We create a div with the class inputBx for styling purposes, and inside it, we add an input element for the username. This input field has a placeholder text “Username”.
   <div class="inputBx">
     <input type="text" placeholder="Username" />
</div>- Password Input Field
Similarly, we create another div with the class inputBx and add an input element for the password. This input field has a placeholder text “Password”.
   <div class="inputBx">
     <input type="password" placeholder="Password" />
</div>- Submit Button
We create one more div with the class inputBx and add an input element of type submit. This is the button that users will click to sign in.
   <div class="inputBx">
     <input type="submit" value="Sign in" />
</div>- Links for Forget Password and Signup
Finally, we create a div with the class links that contains two a elements (links) for “Forget Password” and “Signup”.
   <div class="links">
     <a href="#">Forget Password</a>
     <a href="#">Signup</a>
   </div>
   </div>
   </div>
Understanding HTML For Creating Animated Ribbon Login Page
Global Styles
We reset the margin and padding for all elements to zero and set the box-sizing to border-box. We also set the default font for the entire page to “Quicksand”.
* { margin: 0; padding: 0; box-sizing: border-box; font-family: "Quicksand", sans-serif; }Body Styles
We make the body a flex container, centering its content both vertically and horizontally. We set the minimum height to 100vh (viewport height) so it takes up the full height of the screen.
body { display: flex; justify-content: center; align-items: center; min-height: 100vh; width: 100%; overflow: hidden; }Ring Container Styles
We style the ring container to be 500×500 pixels and center its content.
.ring { position: relative; width: 500px; height: 500px; display: flex; justify-content: center; align-items: center; }Decorative Elements Styles
The i tags inside the ring are positioned absolutely and given a border. We use CSS animations to rotate them.
.ring i { position: absolute; inset: 0; border: 2px solid #fff; transition: 0.5s; }Individual i Tag Styles and Animations
Each i tag has different border-radius values and animation durations to create a unique rotating effect.
.ring i:nth-child(1) { border-radius: 38% 62% 63% 37% / 41% 44% 56%; animation: animate 6s linear infinite; }
.ring i:nth-child(2) { border-radius: 41% 44% 56% 59%/38% 62% 63% 37%; animation: animate 4s linear infinite; }
.ring i:nth-child(3) { border-radius: 41% 44% 56% 59%/38% 62% 63% 37%; animation: animate2 10s linear infinite; }
Hover Effect
When the user hovers over the ring container, the border color of the i tags changes to the color specified by the --clr variable, and a shadow effect is added.
.ring:hover i { border: 6px solid var(--clr); filter: drop-shadow(0 0 20px var(--clr)); }Keyframe Animations
We define the animate and animate2 keyframe animations that rotate the i tags 360 degrees.
@keyframes animate { 0% { transform: rotate(0deg); } 100% { transform: rotate(360deg); } }
@keyframes animate2 { 0% { transform: rotate(0deg); } 100% { transform: rotate(360deg); } }
Login Form Container Styles
The login container is positioned absolutely within the ring, centered, and given a flexible column layout with some gap between elements.
.login { position: absolute; width: 300px; height: 100%; display: flex; justify-content: center; align-items: center; flex-direction: column; gap: 20px; }Login Heading Styles
The h2 heading inside the login container is styled with a larger font size and white color.
.login h2 { font-size: 2em; color: #fff; }Input Box Styles
The inputBx class styles the container of the input elements, setting their width to 100%.
.login .inputBx { position: relative; width: 100%; }Input Field Styles
The input elements inside inputBx are styled with padding, a transparent background, a white border, rounded corners, and white text. The submit button has additional styles like a gradient background and a cursor change on hover.
.login .inputBx input { position: relative; width: 100%; padding: 12px 20px; background: transparent; border: 2px solid #fff; border-radius: 40px; font-size: 1.2em; color: #fff; box-shadow: none; outline: none; }
.login .inputBx input[type="submit"] { width: 100%; background: #0078ff; background: linear-gradient(45deg, #ff357a, #fff172); border: none; cursor: pointer; }
Placeholder Text Color
The placeholder text inside the input fields is styled with a slightly transparent white color.
.login .inputBx input::placeholder { color: rgba(255, 255, 255, 0.75); }Links Container Styles
The links class styles the container of the links, setting its width to 100% and using Flexbox to space the links out evenly.
.login .links { position: relative; width: 100%; display: flex; align-items: center; justify-content: space-between; padding: 0 20px; }Link Styles
The a elements (links) inside the links container are styled with white color and no text decoration.
.login .links a { color: #fff; text-decoration: none; }
Animated Ribbon Login Page Source Code
HTML:
<div class="ring">
    <i style="--clr: #00ff0a"></i>
    <i style="--clr: #ff0057"></i>
    <i style="--clr: #fffd44"></i>
    <div class="login">
      <h2>Login</h2>
      <div class="inputBx">
        <input type="text" placeholder="Username" />
      </div>
      <div class="inputBx">
        <input type="password" placeholder="Password" />
      </div>
      <div class="inputBx">
        <input type="submit" value="Sign in" />
      </div>
      <div class="links">
        <a href="#">Forget Password</a>
        <a href="#">Signup</a>
      </div>
    </div>
  </div>
Also Read: Sliding Login & Sign Up Form With HTML & CSS
CSS:
<style>

  @import url("https://fonts.googleapis.com/css2?family=Quicksand:wght@300&display=swap");
  * {
    margin: 0;
    padding: 0;
    box-sizing: border-box;
    font-family: "Quicksand", sans-serif;
  }
  body {
    display: flex;
    justify-content: center;
    align-items: center;
    min-height: 100vh;
    width: 100%;
    overflow: hidden;
  }
  .ring {
    position: relative;
    width: 500px;
    height: 500px;
    display: flex;
    justify-content: center;
    align-items: center;
  }
  .ring i {
    position: absolute;
    inset: 0;
    border: 2px solid #fff;
    transition: 0.5s;
  }
  .ring i:nth-child(1) {
    border-radius: 38% 62% 63% 37% / 41% 44% 56%;
    animation: animate 6s linear infinite;
  }
  .ring i:nth-child(2) {
    border-radius: 41% 44% 56% 59%/38% 62% 63% 37%;
    animation: animate 4s linear infinite;
  }
  .ring i:nth-child(3) {
    border-radius: 41% 44% 56% 59%/38% 62% 63% 37%;
    animation: animate2 10s linear infinite;
  }
  .ring:hover i {
    border: 6px solid var(--clr);
    filter: drop-shadow(0 0 20px var(--clr));
  }
  @keyframes animate {
    0% {
      transform: rotate(0deg);
    }
    100% {
      transform: rotate(360deg);
    }
  }
  @keyframes animate2 {
    0% {
      transform: rotate(0deg);
    }
    100% {
      transform: rotate(360deg);
    }
  }
  .login {
    position: absolute;
    width: 300px;
    height: 100%;
    display: flex;
    justify-content: center;
    align-items: center;
    flex-direction: column;
    gap: 20px;
  }
  .login h2 {
    font-size: 2em;
    color: #fff;
  }
  .login .inputBx {
    position: relative;
    width: 100%;
  }
  .login .inputBx input {
    position: relative;
    width: 100%;
    padding: 12px 20px;
    background: transparent;
    border: 2px solid #fff;
    border-radius: 40px;
    font-size: 1.2em;
    color: #fff;
    box-shadow: none;
    outline: none;
  }
  .login .inputBx input[type="submit"] {
    width: 100%;
    background: #0078ff;
    background: linear-gradient(45deg, #ff357a, #fff172);
    border: none;
    cursor: pointer;
  }
  .login .inputBx input::placeholder {
    color: rgba(255, 255, 255, 0.75);
  }
  .login .links {
    position: relative;
    width: 100%;
    display: flex;
    align-items: center;
    justify-content: space-between;
    padding: 0 20px;
  }
  .login .links a {
    color: #fff;
    text-decoration: none;
  }

  </style>
Last Updated: June 18, 2024


