How To Make Custom File Uploader With HTML, CSS & JavaScript

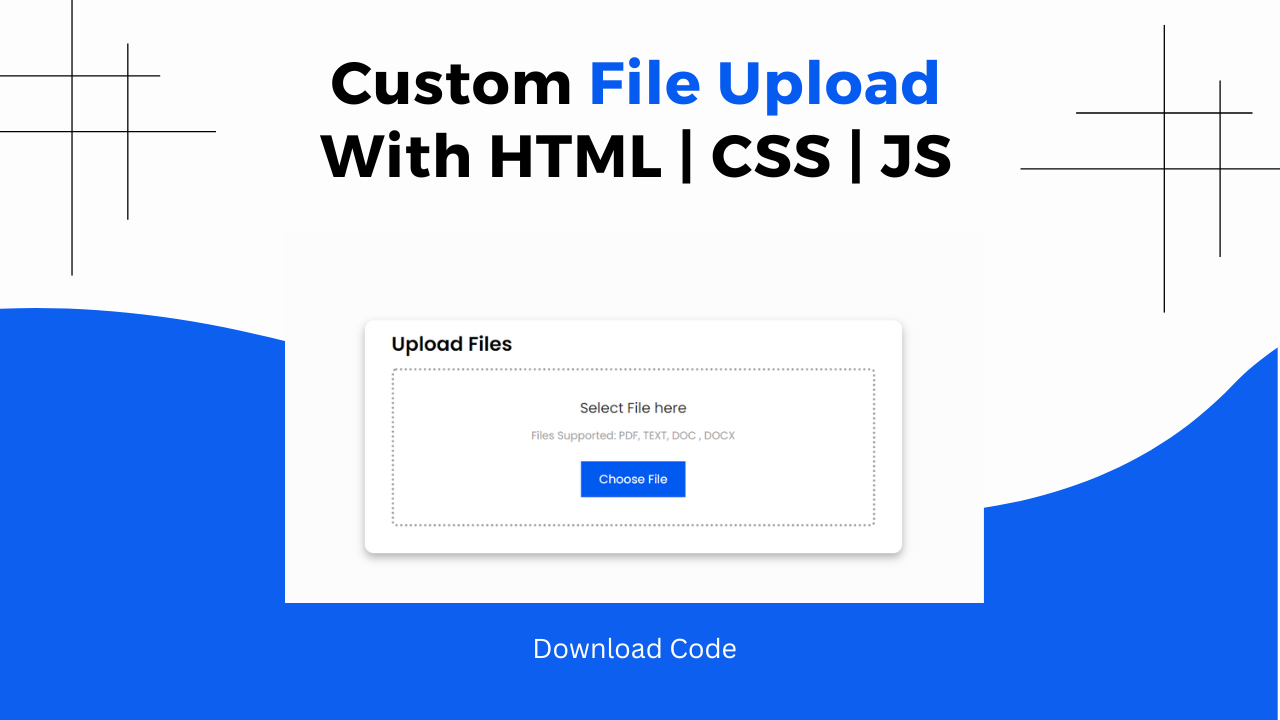
Hey Programmers! In this post, we will make a custom File uploader with HTML, CSS & JavaScript. When we have to make a tool website As we know we have an HTML Input Tag to upload files on the webpage, and we will make this normal file input field look professional.
Apart from this, we will see how we can upload more than one file & display all the uploaded files on the web page. This tutorial aims to show how we can use JavaScript with HTML Input tags.
Also Read: Cool Email Input Feild With HTML & CSS
I will explain all the code step by step so that you can make such a custom file uploader on your own. At the end, I will provide the entire source code so that you can run this project on your local machine.
Concepts Used To Make Custom File Uploader
- HTML File Input
- CSS Border Radius & Box Shadow
- CSS Flex Box & Box Model
- JavaScritp Query Selector
- JavaScript Change Event Listener
Understanding HTML To Make Custom File Uploader
- Main Container: The
divwith the classcontaineracts as the outermost container, centralizing and aligning the content on the page.
<div class="container">- Card: Inside the
container, there’s adivwith the classcardthat serves as a structured area to display the file upload section.
<div class="card">- Card Title: A
h3tag with the text “Upload Files” serves as the title of the card.
<h3>Upload Files</h3>- Drop Box: A
divwith the classdrop_boxprovides an area where users can drag and drop files or click to select them.
<div class="drop_box">- Drop Box Header: Inside the
drop_box, aheadercontains ah4tag prompting users to “Select File here”.
   <header>
     <h4>Select File here</h4>
</header>- Supported Files Info: A
ptag describes the types of files supported: PDF, TEXT, DOC, DOCX.
<p>Files Supported: PDF, TEXT, DOC , DOCX</p>- Hidden File Input: An
inputelement of typefileis hidden, allowing users to select files from their devices. It only accepts files with extensions.doc,.docx, and.pdf.
<input type="file" hidden accept=".doc,.docx,.pdf" id="fileID" style="display:none;">- Choose File Button: A
buttonwith the classbtnthat, when clicked, will trigger the file input to open the file selection dialog.
<button class="btn">Choose File</button>Also Read: OTP Input Feild With HTML & CSS
Understanding CSS To Make Custom File Uploader
- Global Styling: Universal selectors reset margin, padding, and box-sizing, and set a default font.
   * {
     margin: 0;
     padding: 0;
     box-sizing: border-box;
     font-family: "Poppins", sans-serif;
}- Container Styling: The
containerclass is styled to center its content vertically and horizontally within the viewport.
   .container {
     height: 100vh;
     width: 100%;
     align-items: center;
     display: flex;
     justify-content: center;
     background-color: #fcfcfc;
}- Card Styling: The
cardclass is styled to give it a white background, rounded corners, and a shadow. It’s sized and padded to fit the content nicely.
   .card {
     border-radius: 10px;
     box-shadow: 0 5px 10px 0 rgba(0, 0, 0, 0.3);
     width: 600px;
     height: 260px;
     background-color: #ffffff;
     padding: 10px 30px 40px;
}- Card Title Styling: The
h3within the card has a font size of22pxand a bold weight to stand out as the title.
   .card h3 {
     font-size: 22px;
     font-weight: 600;
}- Drop Box Styling: The
drop_boxclass is styled to center its content and display a dotted border. It has padding and rounded corners.
   .drop_box {
     margin: 10px 0;
     padding: 30px;
     display: flex;
     align-items: center;
     justify-content: center;
     flex-direction: column;
     border: 3px dotted #a3a3a3;
     border-radius: 5px;
}- Drop Box Header Styling: The
h4inside thedrop_boxhas a moderate font size and a lighter color.
   .drop_box h4 {
     font-size: 16px;
     font-weight: 400;
     color: #2e2e2e;
}- Supported Files Info Styling: The
pinside thedrop_boxis styled with a smaller font size and a light grey color, with top and bottom margins for spacing.
   .drop_box p {
     margin-top: 10px;
     margin-bottom: 20px;
     font-size: 12px;
     color: #a3a3a3;
}- Button Styling: The .btn class styles the button with a blue background, white text, and padding. It transitions when hovered to inverted colors and outlines the button.
   .btn {
     text-decoration: none;
     background-color: #005af0;
     color: #ffffff;
     padding: 10px 20px;
     border: none;
     outline: none;
     transition: 0.3s;
   }

   .btn:hover {
     text-decoration: none;
     background-color: #ffffff;
     color: #005af0;
     padding: 10px 20px;
     border: none;
     outline: 1px solid #010101;
}- Form Input Styling: The
.form inputstyles input fields within forms with a grey background, rounded corners, and padding.
   .form input {
     margin: 10px 0;
     width: 100%;
     background-color: #e2e2e2;
     border: none;
     outline: none;
     padding: 12px 20px;
     border-radius: 4px;
   }
Understanding JavaScript To Make Custom File Uploader
- Select Elements: The script selects elements within the
.drop_boxlike the button, header, and input field usingdocument.querySelector.
   const dropArea = document.querySelector(".drop_box"),
     button = dropArea.querySelector("button"),
     dragText = dropArea.querySelector("header"),
input = dropArea.querySelector("input");- File Variable: A variable
fileis declared to store the file object when a file is selected.
let file;- Button Click Event: An event listener is added to the button to trigger the hidden file input when clicked. This opens the file selection dialog.
   button.onclick = () => {
     input.click();
   };
Source Code Of Cusotme File Uploader
HTML:
<div class="container">
    <div class="card">
      <h3>Upload Files</h3>
      <div class="drop_box">
        <header>
          <h4>Select File here</h4>
        </header>
        <p>Files Supported: PDF, TEXT, DOC , DOCX</p>
        <input type="file" hidden accept=".doc,.docx,.pdf" id="fileID" style="display:none;">
        <button class="btn">Choose File</button>
      </div>
    </div>
  </div>
CSS:
<style>
    @import url("https://fonts.googleapis.com/css2?family=Poppins:wght@200;300;400;500;600;700&display=swap");
@import url('https://fonts.googleapis.com/css2?family=Noto+Sans:ital,wght@0,400;0,700;1,400;1,700&display=swap');

* {
  margin: 0;
  padding: 0;
  box-sizing: border-box;
  font-family: "Poppins", sans-serif;
}

.container {
  height: 100vh;
  width: 100%;
  align-items: center;
  display: flex;
  justify-content: center;
  background-color: #fcfcfc;
}

.card {
  border-radius: 10px;
  box-shadow: 0 5px 10px 0 rgba(0, 0, 0, 0.3);
  width: 600px;
  height: 260px;
  background-color: #ffffff;
  padding: 10px 30px 40px;
}

.card h3 {
  font-size: 22px;
  font-weight: 600;

}

.drop_box {
  margin: 10px 0;
  padding: 30px;
  display: flex;
  align-items: center;
  justify-content: center;
  flex-direction: column;
  border: 3px dotted #a3a3a3;
  border-radius: 5px;
}

.drop_box h4 {
  font-size: 16px;
  font-weight: 400;
  color: #2e2e2e;
}

.drop_box p {
  margin-top: 10px;
  margin-bottom: 20px;
  font-size: 12px;
  color: #a3a3a3;
}

.btn {
  text-decoration: none;
  background-color: #005af0;
  color: #ffffff;
  padding: 10px 20px;
  border: none;
  outline: none;
  transition: 0.3s;
}

.btn:hover{
  text-decoration: none;
  background-color: #ffffff;
  color: #005af0;
  padding: 10px 20px;
  border: none;
  outline: 1px solid #010101;
}
.form input {
  margin: 10px 0;
  width: 100%;
  background-color: #e2e2e2;
  border: none;
  outline: none;
  padding: 12px 20px;
  border-radius: 4px;
}
  </style>
JavaScript:
<script>
    const dropArea = document.querySelector(".drop_box"),
  button = dropArea.querySelector("button"),
  dragText = dropArea.querySelector("header"),
  input = dropArea.querySelector("input");
let file;
var filename;

button.onclick = () => {
  input.click();
};

input.addEventListener("change", function (e) {
  var fileName = e.target.files[0].name;
  let filedata = `
    <form action="" method="post">
    <div class="form">
    <h4>${fileName}</h4>
    <input type="email" placeholder="Enter email upload file">
    <button class="btn">Upload</button>
    </div>
    </form>`;
  dropArea.innerHTML = filedata;
});

  </script>
Last Updated: July 1, 2024


