How To Make Blogger Template From Scratch
by JSM Hemant |
June 25, 2025
Blogger Theme Development | How To Make Blogger Template From Scratch
hello! friends, in this blog post, we are going know how to make Blogger Template From Scratch. There are few resources available on the internet that help in developing a template for the Google Blogger platform, as very few people use it.
Blogger offers limited hosting, and since Google manages the hosting, there is no worry about traffic handling.
There are fewer themes that match our new requirements for making a blog on the Blogger platform. Some of them have a clean and minimalist design, unwanted widgets, and footer credits.
to overcome this issue, we can develop our own blogger theme, which is SEO-friendly, has no credit in the footer, and has a minimal look like WordPress themes.
in this guide, we will build a blogger template from scratch, step by step. You must have knowledge of HTML, CSS, and JavaScript. so let’s start developing!
Table of Contents
Advantages To Make Blogger Template From Scratch
- Seo Friendly
- No Extra Code
- Loads Fast
- We Can Customize according to our needs
How To Make Blogger Template From Scratch
At first, we will prepare our blogger dashboard for theme development We have to remove the code of the previous theme and make our theme blank.
Then we will understand some basic concepts of Blogger and start developing each component, like navigation, post cards, and the sidebar, that are compatible with Blogger.
Making Our Blogger Dashboard Ready For Theme Development
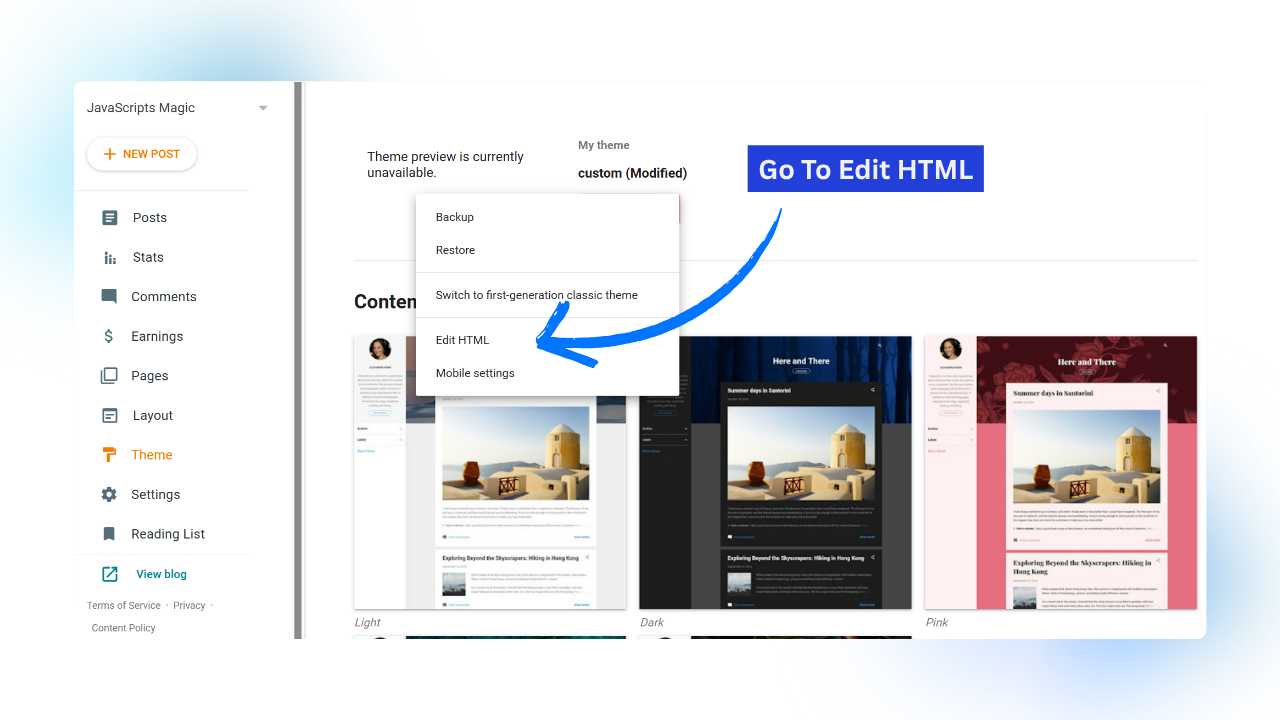
Step 1
Go To Blogger Admin Panel and Navigate To The Theme Section, Then Click On Edit Theme Option As Shown In the Above Image.
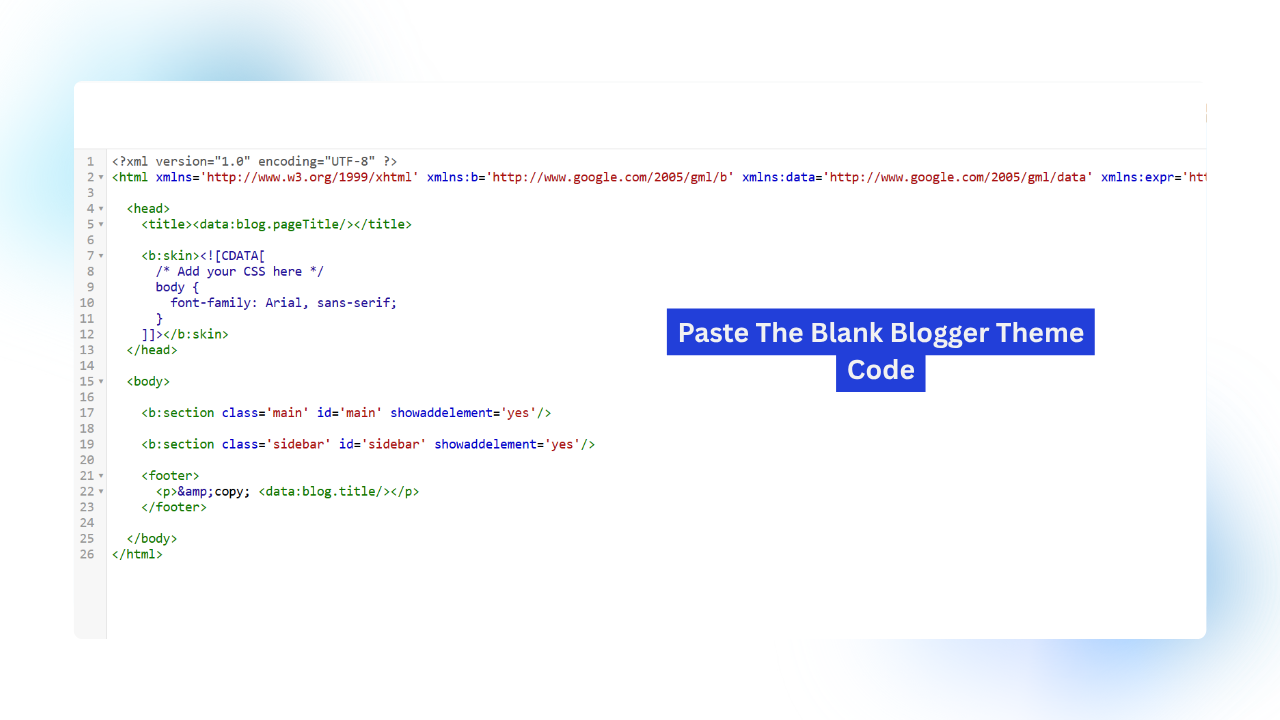
Step 2
Delete All The Theme Code Available Of The Previous Theme And Paste The Blank Blogger Theme Code To Make Blogger Template From Scratch:
<data:blog.pageTitle/>
<b:skin><![CDATA[ /* Add your CSS here */ body { font-family: Arial, sans-serif; } ]]></b:skin>
<b:section class='main' id='main' showaddelement='yes'/> <b:section class='sidebar' id='sidebar' showaddelement='yes'/> <footer> <p>&copy; <data:blog.title/></p> </footer>Understanding Blogger Concepts Needed To Make Blogger Template
Important Blogger XML Tags:
<b:skin>:<b:template-skin><b:section><b:widget><b:includable>
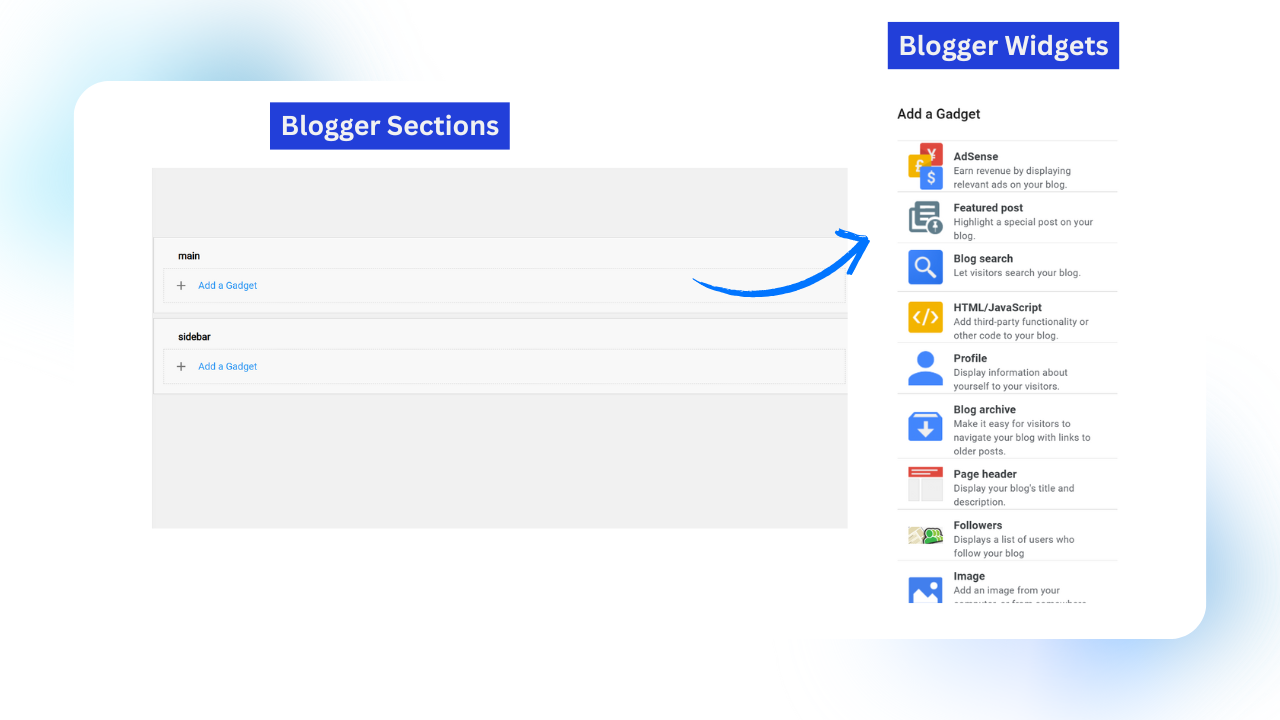
Understanding The Blogger Section / Widget :
In blogger theme development Sections are the special containers that wraps the widget like resent post, all posts cards, or any other type of widgets provided by the blogger. In Simple words we create section to hold the widget.
The section needs some required attribute like unique ID, Class & Attribute that enables to add different types of widgets (elements) in the section know as showaddelement=”true”. Showaddelement can be true or false. As name suggests False do not allow user to add widget and true allows users to add different types of widget in the section.
<b:section class='demo-class' id='demo' showaddelement="true">
</b:section>
Widget (Widgets can only be created in the section) Are the functionality provided by the blogger to add different types of widgets like Adsense widget, Featured Post Widget, Blog Search, Profile, Followers, Etc As Shown In Following Image.
Blogger Post Loop :
The Blogger Post Loop Helps Us Display Our Published Blog Posts On The Homepage, Label Pages, Or Search Pages — Basically Anywhere You Want To Show Multiple Posts.
It’s A Special Section In The Blogger Template Written In XML & HTML That Loops Through All Blog Posts That You Published.
For Each Post In That Loop, Blogger Gives You Access To Post Specific Data — Like Post Title, Post Thumbnail, Post Date, Post Label, Etc.
This Is What Lets You Control How Each Post Appears — So You Can Customize The Layout, Add Styling, Or Even Place Custom Buttons Below Each Post (Read More Button).
Once You Understand How The Post Loop Works, You Can Build A Fully Custom Homepage Or Label Page Design Without Touching Any JavaScript Or Backend Code.
<b:loop var='post' values='data:posts'>
  <!-- Your HTML And Blogger Data Expressions Go Here-->
</b:loop>
Getting Data Dynamically With Data & Expr Tags :
| data:blog.pageTitle | Returns The Title Of Your Blog |
| data:blog.url | Returns The Url Of Your Blog |
| data:blog.title | Returns The Blogs Main Title |
| data:blog.description | Returns The Description Of The Blog |
| data:blog.homepageurl | Returns The URL Of Home Page |
| data:post.title | Gives The Title Of The Post |
| data:post.body | Gives The Content Body Of The Post |
| data.post.url | Gives The Url Of Single Post |
| data.post.timestamp | Gives The TimesStamp Of The Post |
| data:post.author | Gives The Author Of The Post |
| data:post.labels | Returns An Array Of Post Labels |
| data:post.comments | Returns An Array Of Post Comments |
| data:post.snippet | Returns Short Summery Of Post Used To Display On Home Page |
Conditional Tags :
| Condition | Code |
| Single Page (Post Or Page) | <b:if cond=’data:view.isSingleItem’></b:if> |
| Multiple Page | <b:if cond=’data:view.isMultipleItems’></b:if> |
| Label Search Page | <b:if cond=’data:view.isLabelSearch’></b:if> |
| Search Page | <b:if cond=’data:view.isSearch and !data:view.isLabelSearch’></b:if> |
| Post Page (Post Content Page) | <b:if cond=’data:view.isPost’></b:if> |
| Static Page | <b:if cond=’data:view.isPage’></b:if> |
| Home Page | <b:if cond=’data:view.isHomepage’></b:if> |
| Archive Page | <b:if cond=’data:view.isArchive’></b:if> |
| 404 Page | <b:if cond=’data:view.isError’></b:if> |
Now you have completed 80% work on developing the blogger theme. If you are good at HTML, CSS & JavaScript, then it’s very easy to follow the below, as we are only going to convert HTML code to XML Code.
Start Developing Individual Components Step By Step
To develop the individual components, we need to have basic knowledge of HTML, CSS, and JavaScript. If you are not familiar with this, you can use your favorite NLM Tool, Like Chat GPT
- Developing The Navigation Bar
- Making Footer
- Developing Postcards
- Adding Dynamic Post Name
- Adding Dynamic Post Author
- Adding Dynamic Post Date
- Adding Dynamic Featured Image
- Making Posts Only Visible On The Home Page
- Making Sidebar
- Making The Sidebar Only Visible On The Post Page
- Adding A Useful Sidebar Widget
At first we will develop the components which are same on all screens like navigation bar & footer and then we will develop screen specific features like sidebar, posts cards, post content, etc.
The components that we are going to develop are basic for simplicity purpose. The main goal is to understand how you can develop blogger template if you know how to write HTML, CSS & JavaScript.
Developing The Navigation Bar
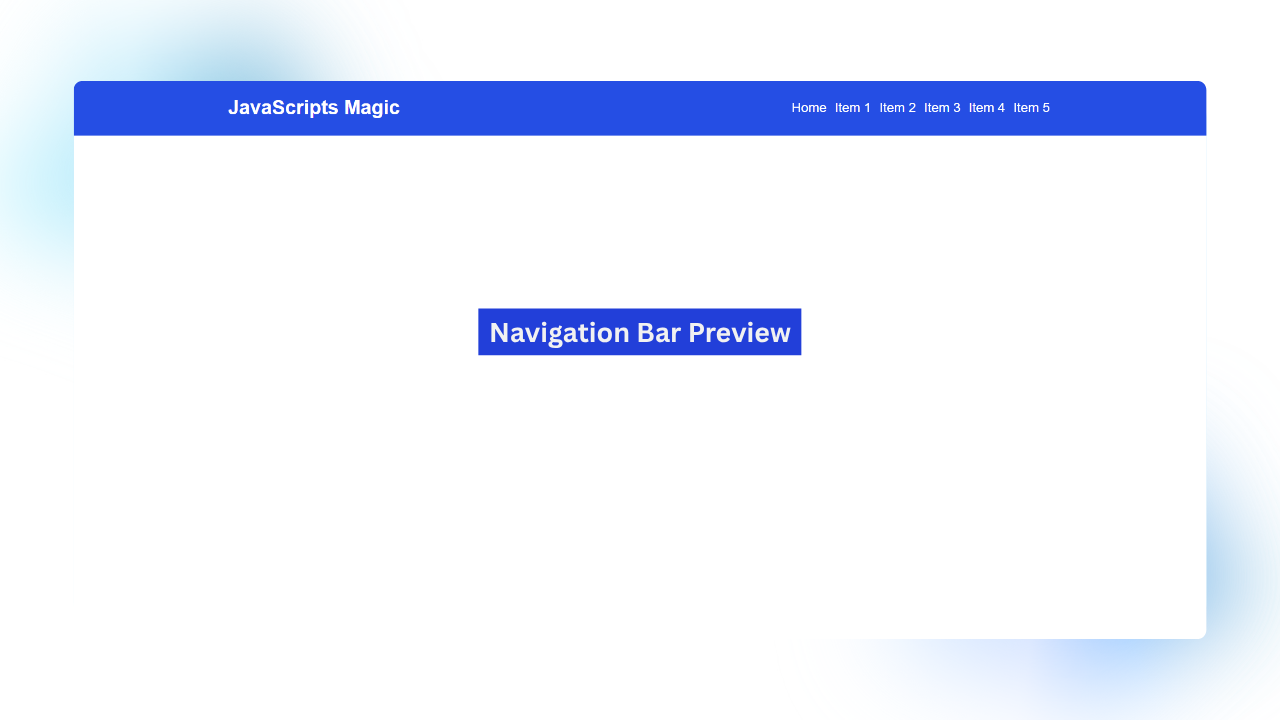
Step 1
Developing Navigation Bar: Navigation bar contains the Logo and the menu its which are categories of your blog. On the left side, there will be a logo or the Title of the blog, which we will get dynamically as shown in the following code.
Then We Will Add Menu Its In The Form Of List Items On The Right Side As Shown In the Above Image.
  <div class='navigation_bar'>
      <div class='nav_left'>
        <h2>JavaScripts Magic</h2>
      </div>

      <div class='nav_right'>
        <ul>
          <li><a href=''>Home</a></li>
          <li><a href=''>Item 1</a></li>
          <li><a href=''>Item 2</a></li>
          <li><a href=''>Item 3</a></li>
          <li><a href=''>Item 4</a></li>
          <li><a href=''>Item 5</a></li>
        </ul>
      </div>
    </div>
    <style>
     .navigation_bar{
		display: flex;
		width: 100%;
		justify-content: space-around;
		align-items: center;
		background: #254ee4;
}
		.nav_left h2{
		color: white;
}
		.nav_right ul{
		display: flex;
		list-style: none;
		align-items: center;
		gap: 10px;
}
		.nav_right ul li a{
		color: white;
		text-decoration: none;
}
    </style>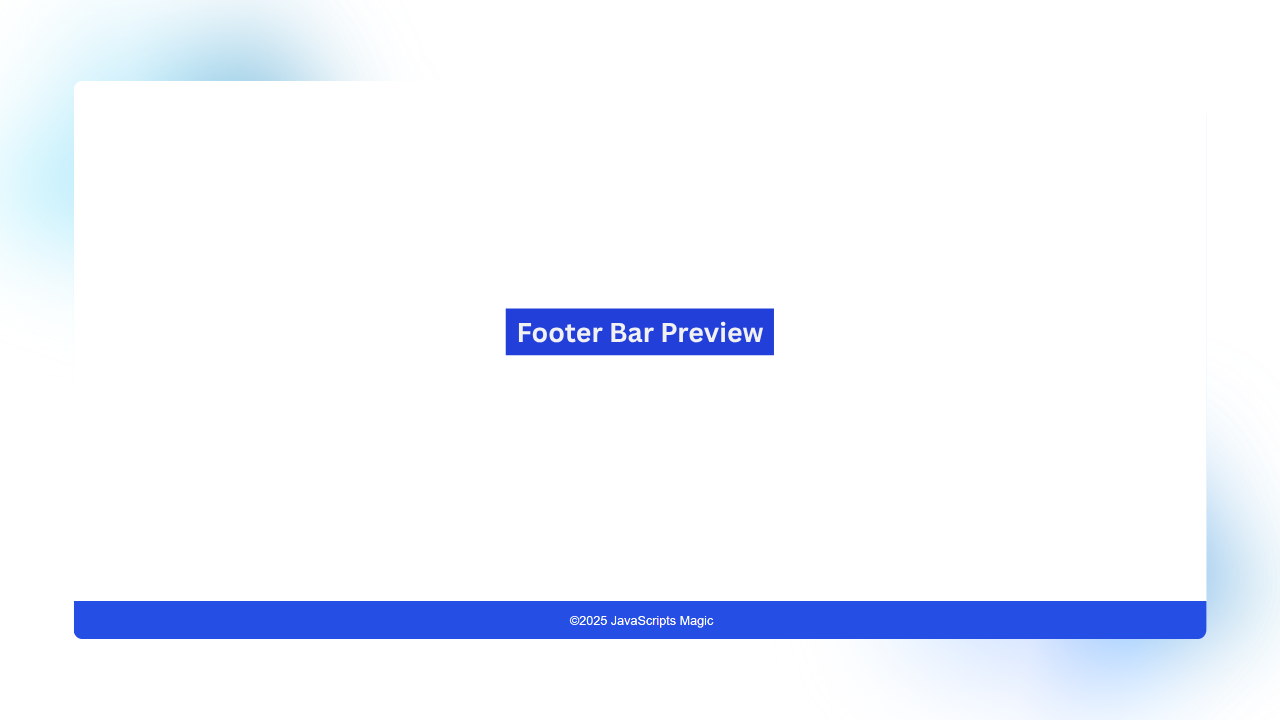
Step 2
Developing Footer: Footer Contains Only Text & Copyright About Blog. We can add about section, recent posts, Quick Links, etc. feature according to your needs. We are going to keep it simple for not making this tutorial too big.
<footer>
<p>©2025 JavaScripts Magic</p>
</footer>
<style>
footer {
background: #254ee4;
color: white;
display: flex;
text-align: center;
justify-content: center;
position: absolute;
width: 100%;
bottom: 0;
}
</style>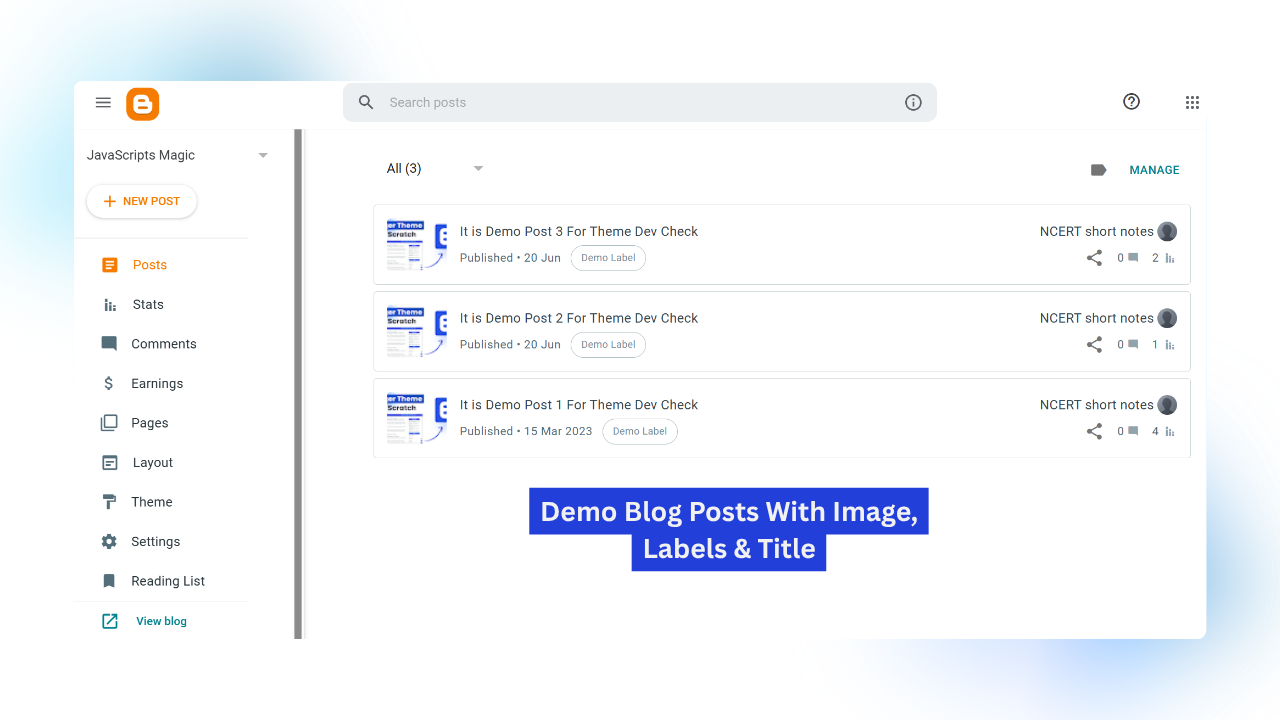
Step 3
Publish Some Demo Posts: To display the blog posts on the home page we need to publish some demo blog post from our dashboard. Add Post title, Image In The Post which will act as featured image & Give Label to the post. As Shown In Above Image
Step 4
Generating Blog Widget: We have navigation bar & footer in our theme now its time to display the blog posts on home page.
To show the blog posts we have to add blog widget in our blank theme. We can easily add blog widget in our theme by just adding following code:
<b:section class='main' id='main' maxwidgets='' showaddelement='yes'
<b:widget id='Blog1' locked='true' title='Blog Posts' type='Blog'>

</b:widget>
</b:section>
Now Our Theme Code Look Like This:
<?xml version="1.0" encoding="UTF-8" ?>
<html xmlns='http://www.w3.org/1999/xhtml' xmlns:b='http://www.google.com/2005/gml/b' xmlns:data='http://www.google.com/2005/gml/data' xmlns:expr='http://www.google.com/2005/gml/expr'>
<head>
<title><data:blog.pageTitle/></title>
<b:skin><![CDATA[
:root{
--pri: #254ee4;
--sec: ;
}
/* Add your CSS here */
body {
font-family: Arial, sans-serif;
margin: 0px;
padding: 0px;
box-sizing: border-box;
}
.navigation_bar{
display: flex;
width: 100%;
justify-content: space-around;
align-items: center;
background: #254ee4;
}
.nav_left h2{
color: white;
}
.nav_right ul{
display: flex;
list-style: none;
align-items: center;
gap: 10px;
}
.nav_right ul li a{
color: white;
text-decoration: none;
}
footer{
background: #254ee4;
color: white;
display: flex;
text-align: center;
justify-content: center;
position: absolute;
width: 100%;
bottom: 0;
}
]]></b:skin>
</head>
<body>
<div class='navigation_bar'>
<div class='nav_left'>
<h2>JavaScripts Magic</h2>
</div>
<div class='nav_right'>
<ul>
<li><a href=''>Home</a></li>
<li><a href=''>Item 1</a></li>
<li><a href=''>Item 2</a></li>
<li><a href=''>Item 3</a></li>
<li><a href=''>Item 4</a></li>
<li><a href=''>Item 5</a></li>
</ul>
</div>
</div>
<b:section class='main' id='main' maxwidgets='' showaddelement='yes'>
<b:widget id='Blog1' locked='true' title='Blog Posts' type='Blog'>
</b:widget>
</b:section>
<b:section class='sidebar' id='sidebar' showaddelement='yes'/>
<footer>
<p>©2025 JavaScripts Magic</p>
</footer>
</body>
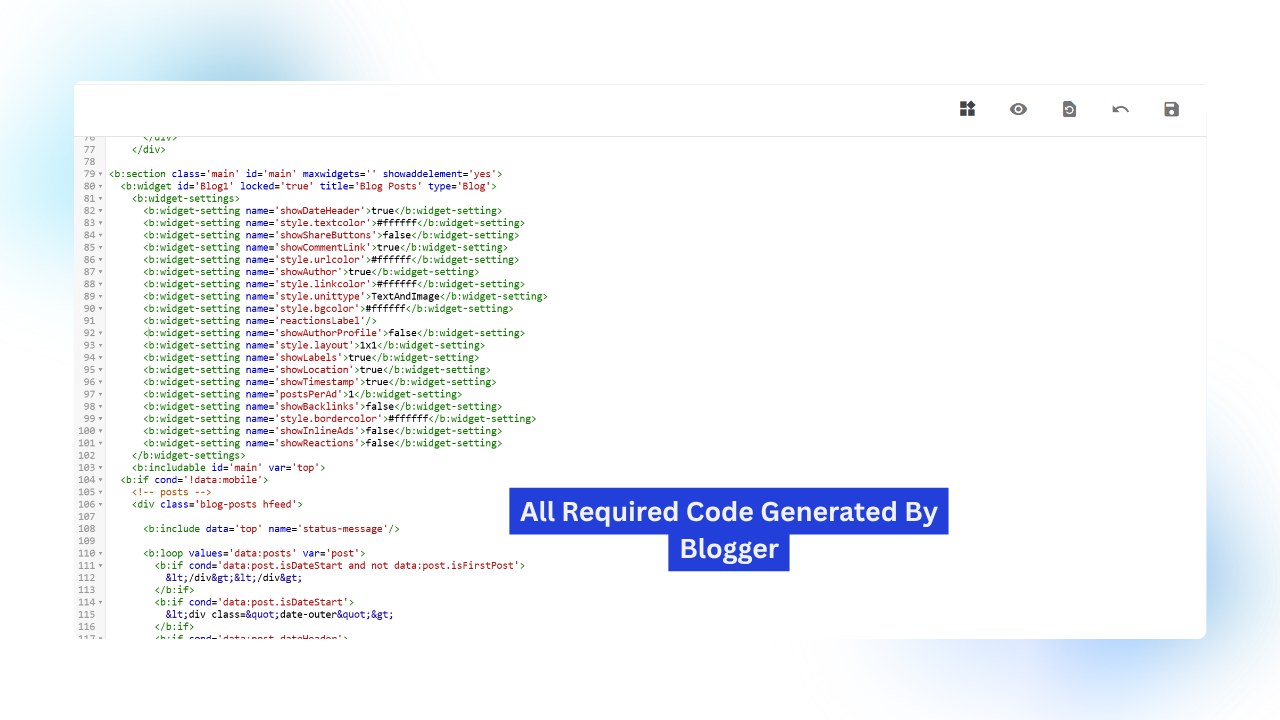
</html>Now You Have to Just Save The Code & Blogger Wil Automatically Generate The Rest Of Code As Shown In Following Image:
In this way we have successfully added the blog widget in our theme. If we visit the home page of our blog we can see the list of all blog posts shown as you can see in following image:
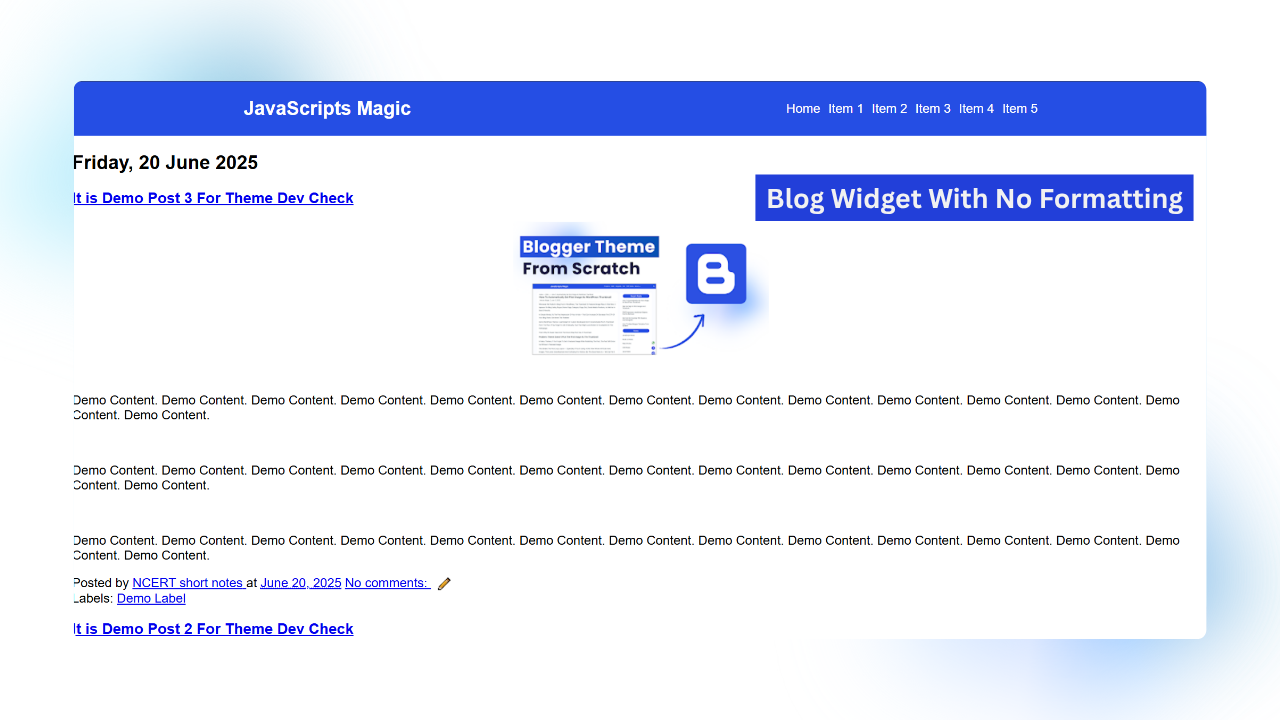
As You Can See In Above Image There Is Now Formatting, The Content Is Shown On Home Page Instead Of Post Cards. Now We have to format this blog widget and show in the form of post cards.
Step 5
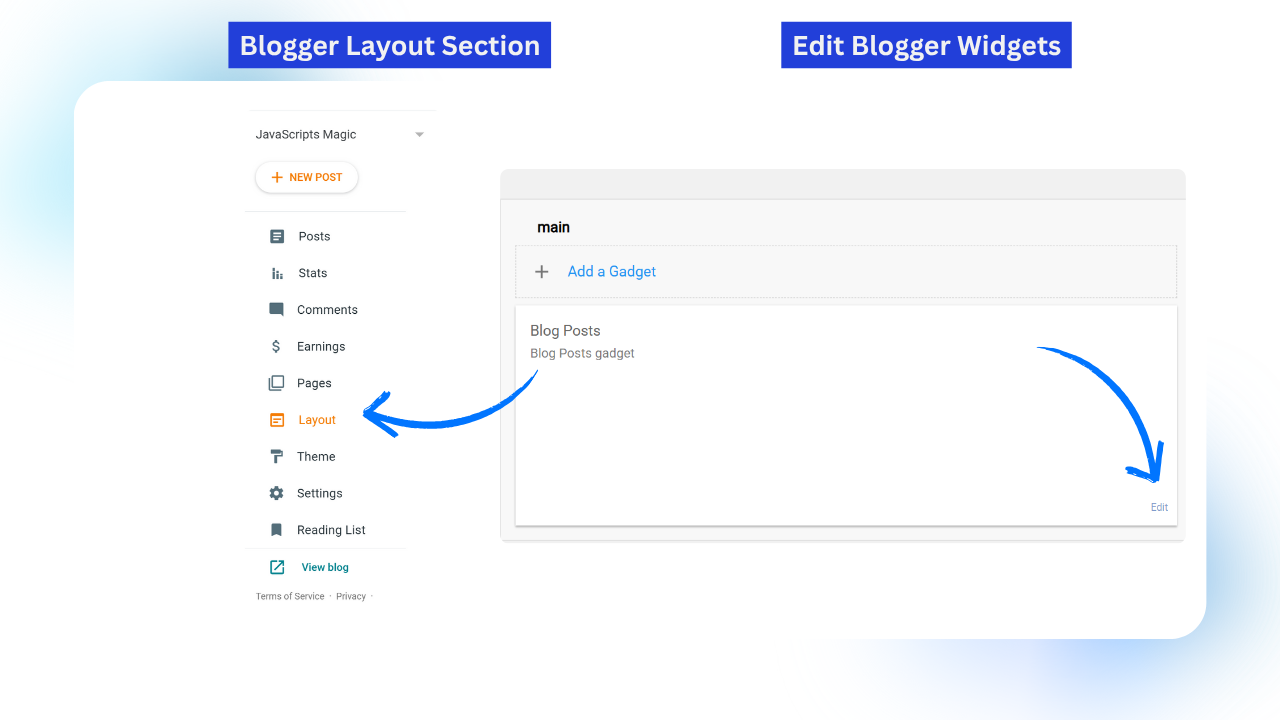
Editing Blogger Widget : Now we have to Format blog widget to reduce the complexity. At first you have to go to the layout section and And Edit The Setting Of Blog Posts Gadgets As Shown In Above Image:
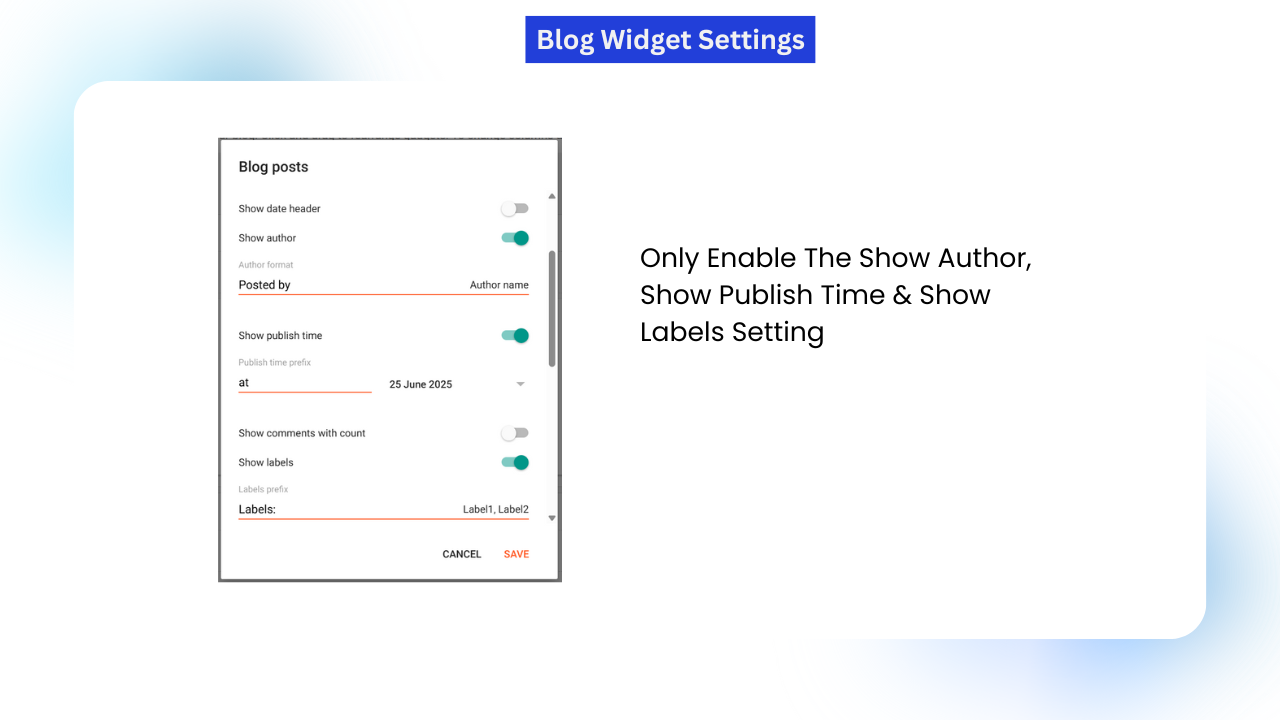
Now Only Enable The Show Author, Show Publish Time & Show Labels Setting Form Simplicity Purpose As Shown In Following Image:
Step 6
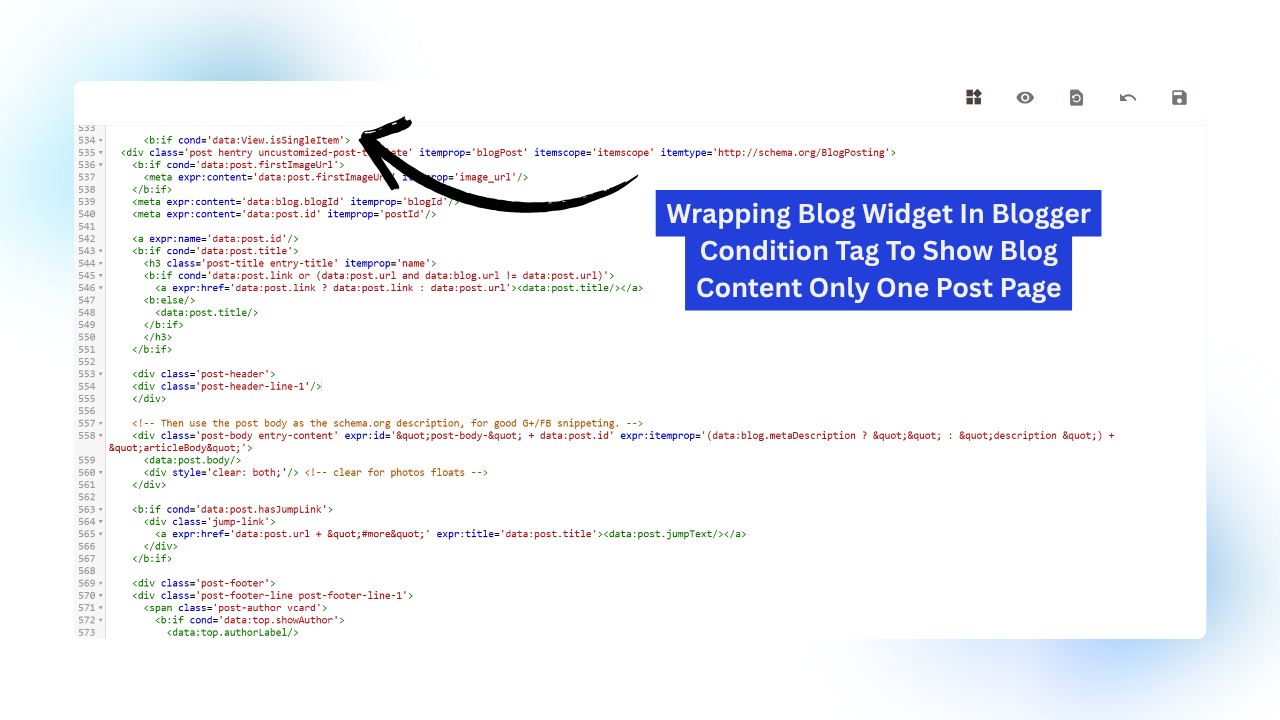
Hiding Post Content On Home Page: As You Can See All The Post Content Is Showing On Home Page Which we don’t want. We want only the post cards shown on home page and when user clicks on cards he should navigate to that post.
To Get This Functionality We Have To Use The Blogger Conditional Tags. And Wrap The Code Of Post Content To Show Only On Single Page.
So find this line of code in your theme:
<div class='post hentry uncustomized-post-template' itemprop='blogPost' itemscope='itemscope' itemtype='http://schema.org/BlogPosting'>Now Wrap the whole div in Following Condition Tag:
<b:if cond='data:view.isPost'></b:if>
</b:if>
Now if you visit the your blog you will see noting on your homepage as we have made blog widget shown only on post or single page. Now Our Next Goal Is To Show The Post Cards On The Home Page.
Step 7
Developing Post Cards: Now We Have Nothing To Show On Home Page. We Have To Render All The Published Posts In The Form On Post Cards. To Develop the post cards you have to find this line of code into your theme:
<b:includable id='post' var='post'>Just Below This Line We Have To Add Code To Show The Posts In The Cards Format. But Before That We Need To Know Some Little Things That Will Help To get the dynamic attribution tags & dynamic data.
- To Get Dynamic Attributes Data: Use ‘expr’
- To Get Dynamic Content In The Tag: Use <data:post.xyz>
We Will See Above Concept In Better Way In Following Post.
Our Post Card Will Be Simple There Will be Two Div within parent div post card upper & post card lower as shown in following code:
 <div class='custom_post_card'>
        <div class="custom_post_cards_upper">
          <img src=""/>
        </div>
        <div class="custome_post_cards_lower">
        <h2> <a href="">This Is Custom Post Card
</a>
</h2>
        </div>
      </div>
Add This Code Below The <b:includable id=’post’ var=’post’> as shown in following image:
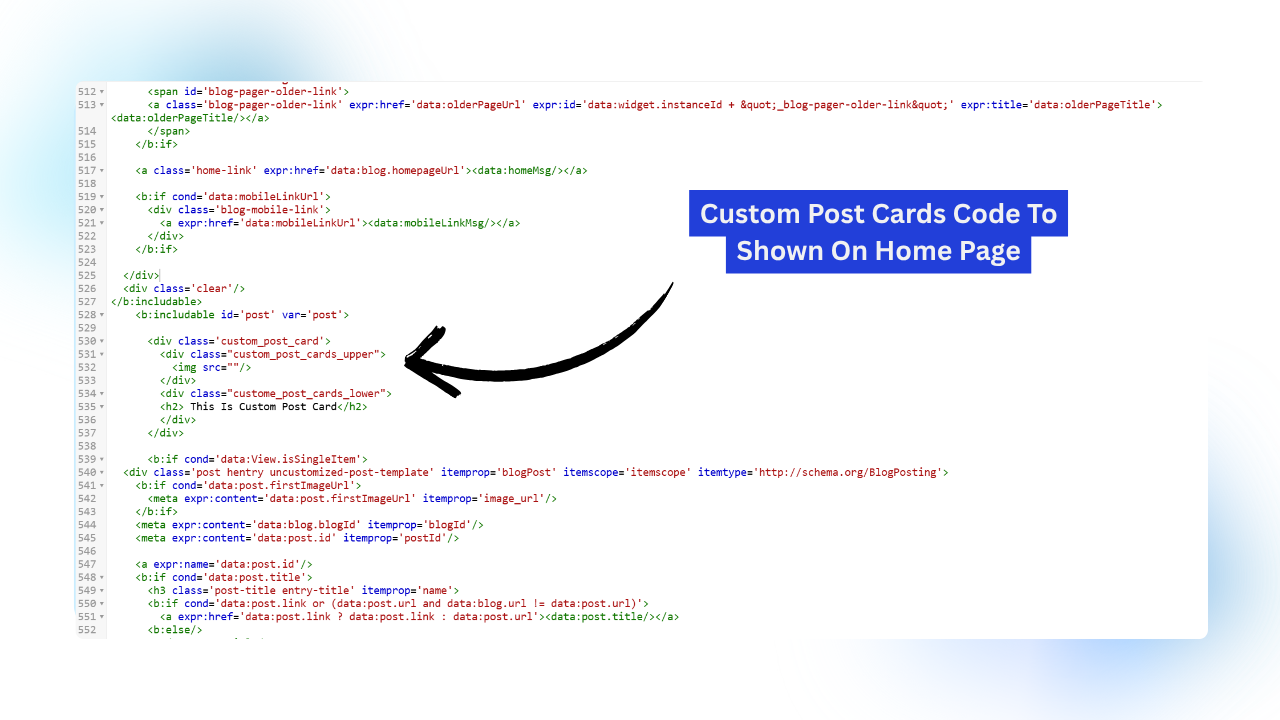
Now We Will Make This Code Dynamic To Get The Dynamic Featured Image & Dynamic Title Of The Post as shown in following code
- To Get The Dynamic Featured Image: expr:src=”data:post.thumbnailUrl”
- To Get The Dynamic Link Of Post Page: expr:href=”data:post.url”
- To Get Dynamic Title of The Post: <data:post.title>
     <div class='custom_post_card'>
        <div class='custom_post_cards_upper'>
          <img expr:src='data:post.thumbnailUrl resizeImage 800'/>
        </div>
        <div class='custome_post_cards_lower'>
        <h2>
          <a expr:href='data:post.url'>
          <data:post.title/>
          </a>
            </h2>
        </div>
      </div>
<!--Demo CSS Code For Above Post Cards-->
<style>
.date-posts {
    display: grid;
    grid-template-columns: repeat(auto-fit, 300px);
    justify-content: center;
    align-items: center;
    margin: 80px auto;
    gap: 20px;
}

.post-outer {
    display: flex;
    flex-direction: column;
    justify-content: center;
    align-items: center;
    text-align: center;
    width: 100%;
}

.custom_post_card {
    width: 100%;
}

.custom_post_cards_upper {
    width: 100%;
}

.custom_post_cards_upper img {
    width: 100%;
    object-fit: cover;
}
</style>
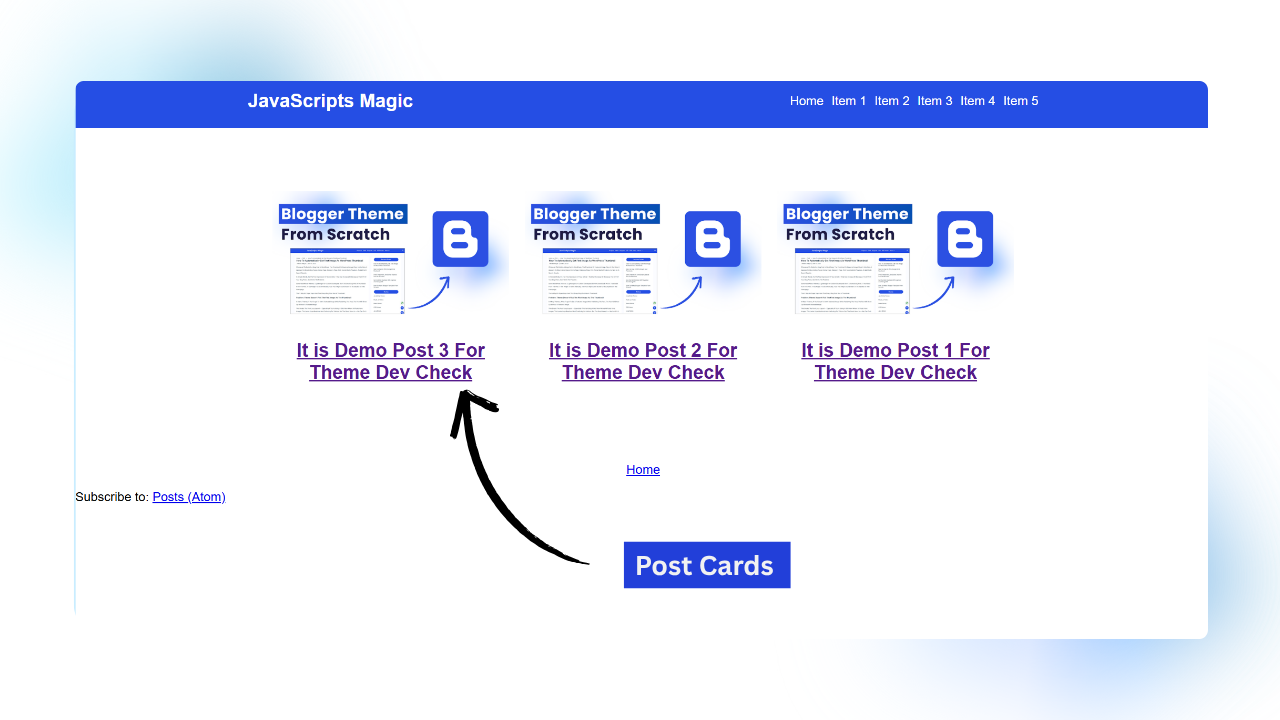
Now if you visit the home page you can see the posts with title & featured image if we click on the title we can go to that post as shown in following image:
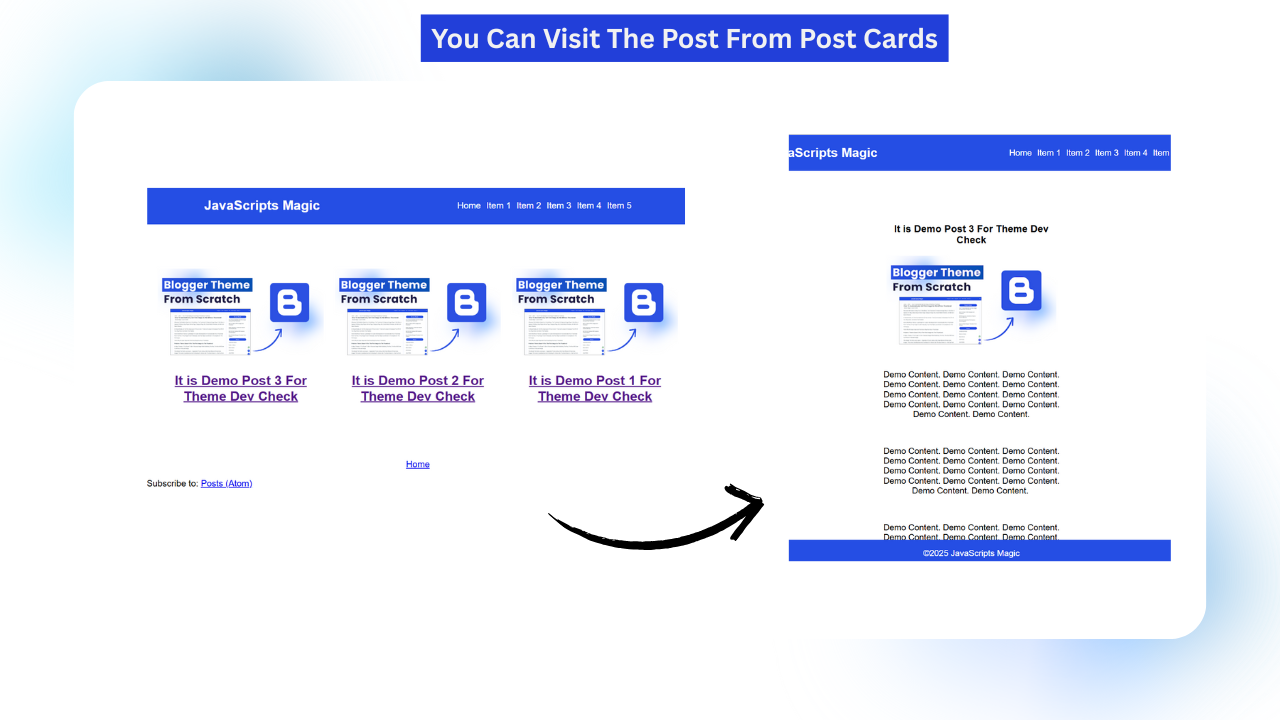
In This Way You Can Make Post Cards In Blogger Theme. You can add more features into it as follows:
- Add Labels: <b:if cond=’data:top.showPostLabels and data:post.labels’> <data:postLabelsLabel/> <b:loop values=’data:post.labels’ var=’label’> <a expr:href=’data:label.url’ rel=’tag’><data:label.name/></a><b:if cond=’not data:label.isLast’>, </b:if> </b:loop> </b:if>
- Add Date: <data:post.date/>
- Featured Image: expr:src=’data:post.thumbnailUrl resizeImage 800′
- Post Snippet: <data:post.snippets.short.jsonEscaped/>
- Post Url: expr:data:posturl
You Can Style This Html Structure As You Want This Was All You Need To Know About How To develop the blogger theme. Now You can use your coding skills & logic to make more advanced blogger themes.
Some Major Errors That Come When Making Blogger Template From Scratch
While developing the blogger templates you can get some blogger specific features that occurs while writing blogger XML. These errors do not occur when we are making the websites with HTML, CSS & JavaScript. Here are those errors & ways to tackle those errors that will save your time:
1) & Errors : When You Have To Add The & In Code You Have To Replace It With &
2) Post Loop Date Based Grouping Error: When You Created The Post Cards And All the post will show in the div but once you add the new post then blogger will create new div for newly published post so there will be two divs which will break the layout. To Fix This You Have To replace following code:
<b:loop values='data:posts' var='post'>
<b:if cond='data:post.isDateStart and not data:post.isFirstPost'>
</div></div>
</b:if>
<b:if cond='data:post.isDateStart'>
<div class="date-outer">
</b:if>
<b:if cond='data:post.dateHeader'>
<h2 class='date-header'><span><data:post.dateHeader/></span></h2>
</b:if>
<b:if cond='data:post.isDateStart'>
<div class="date-posts">
</b:if>
<div class='post-outer'>
<b:include data='post' name='post'/>
<b:include cond='data:blog.pageType in {"static_page","item"}' data='post' name='comment_picker'/>
</div>
<!-- Ad -->
<b:if cond='data:post.includeAd'>
<div class='inline-ad'>
<data:adCode/>
</div>
</b:if>
</b:loop>With This Code:
<div class="date-outer">
  <div class="date-posts">
    <b:loop values='data:posts' var='post'>
      <div class='post-outer'>
        <b:include data='post' name='post'/>
        <b:include cond='data:blog.pageType in {"static_page","item"}' data='post' name='comment_picker'/>
      </div>
      <!-- Ad -->
      <b:if cond='data:post.includeAd'>
        <div class='inline-ad'>
          <data:adCode/>
        </div>
      </b:if>
    </b:loop>
  </div>
</div>
3) Self Closing Tag Issue
Tags Like <img>, <input>, <Link> & <br>Must By Self Closed Like <img/> <input/>, <Link/>, <br/>
Final Words On How To Make Blogger Template From Scratch
This blog post on ‘How to make blogger template from scratch’ was basic guide that will help you to be familiar with the blogger. There are very less resources available on the internet that teaches how to make blogger template.
If you have good knowledge of the HTML, CSS & JavaScript then with the help of above guide you can develop any type of blogger template. We have not gone that deep and explored how to make this mobile friendly, search feature, hero header, SEO friendly meta tags, etc
You can develop these features on blogger with the help concepts discussed above. Now its upon your requirements how much features that you want to add. With the help of blogger conditional tags & blogger expressions that help you to get the dynamic data you can make more templates.